 # 安装 ROOT 软件
这里重新说一下我安装方法,之前的也可以,看个人需求了。
首先,从ROOT 官方网站下载预编译软件包。
其次但是很重要的是使用 windows 的powershell(这是一个终端,目前 win11/10 都支持),ubuntu 我使用的是zsh。
ubuntu 配置
安装 ROOT 软件

-
在 Windows 上安装 WSL 并配置 Ubuntu 子系统(详细配置教程可自行搜索)。
-
打开 WSL 终端,创建并进入一个新的文件夹:
mkdir ROOT && cd ROOT
- 下载并解压 ROOT 软件包:
复制最新的对应 linux 系统的 ROOT 链接(这里我的是 ubuntu)
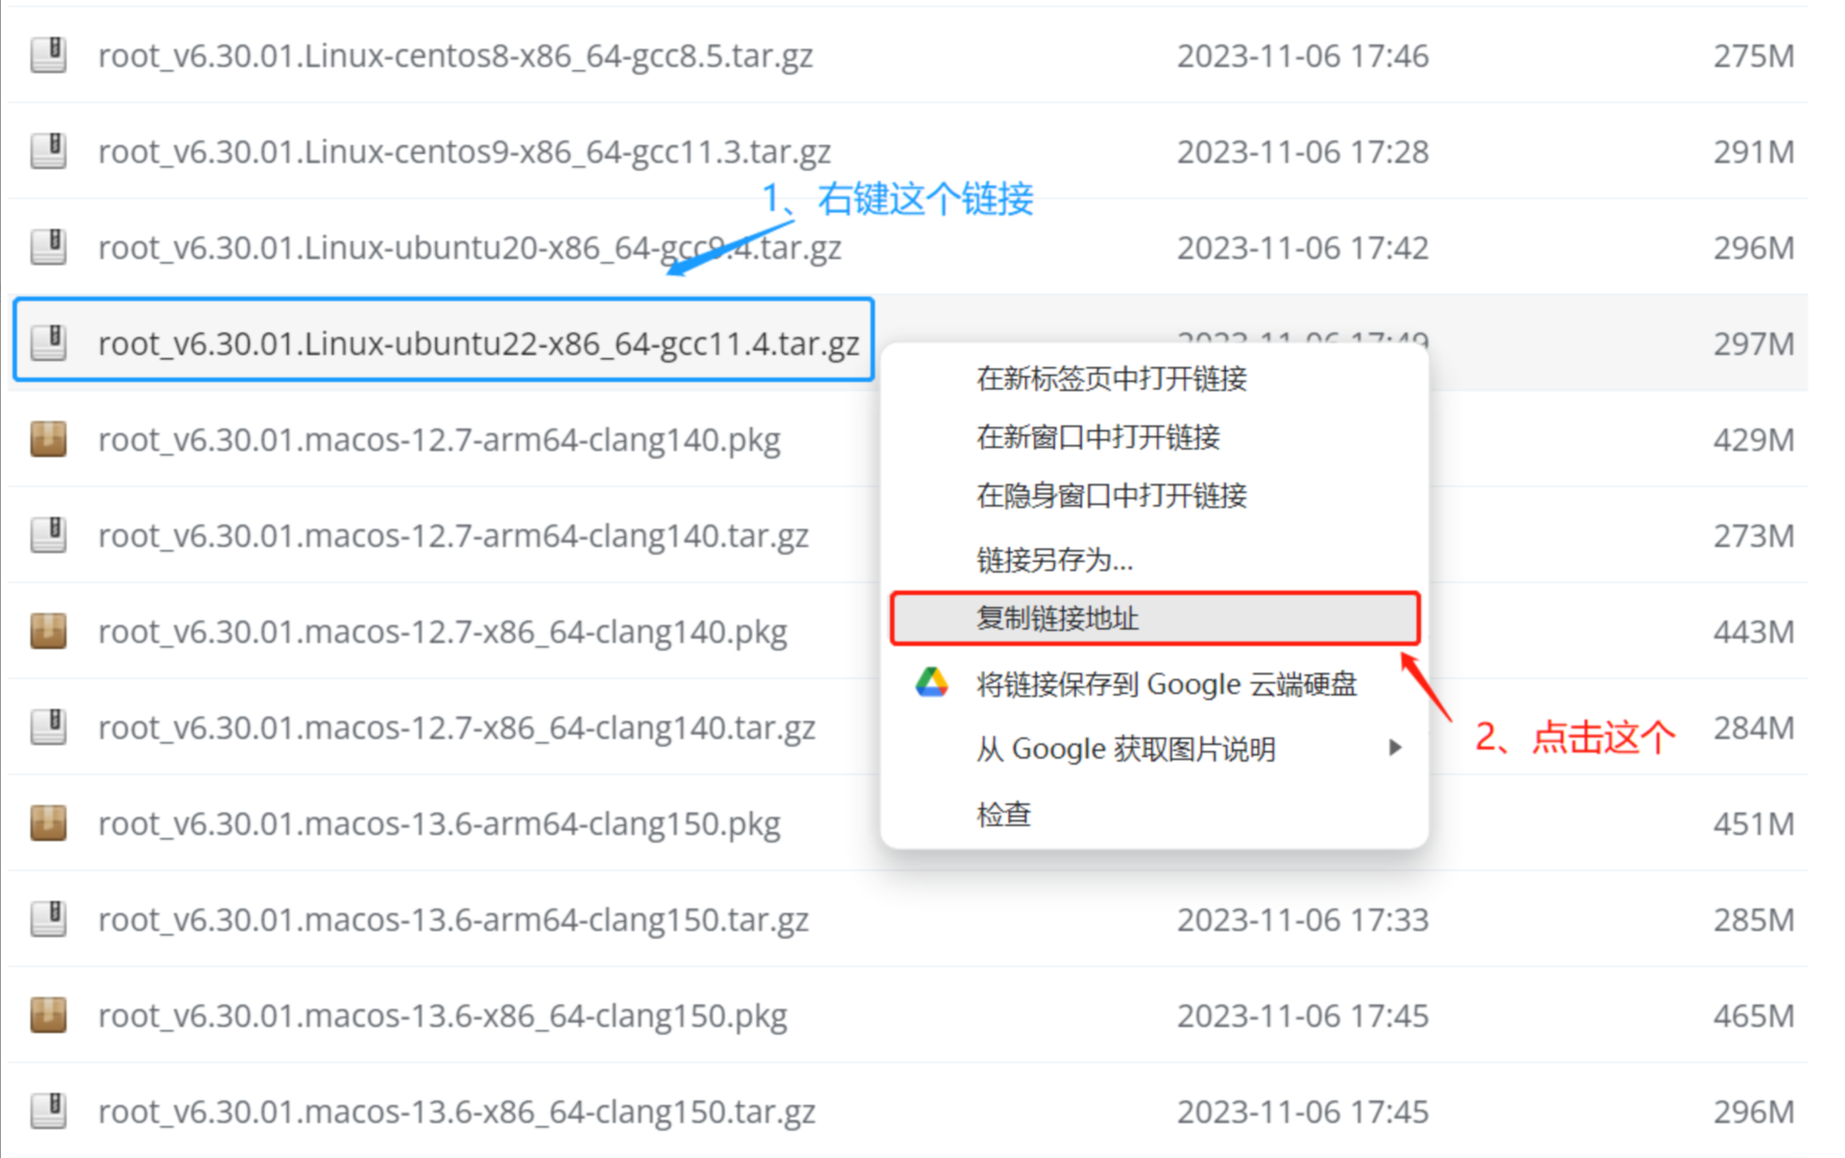
# wget https://root.cern/download/root_v6.30.01.Linux-ubuntu22-x86_64-gcc11.4.tar.gz
wget 复制的链接
# 解压
tar -xzvf root_xxx.tar.gz
- 将 ROOT 的环境变量写入
.bashrc:
# 写入环境变量
echo "source /path/to/ROOT/root/bin/thisroot.sh" >> ~/.bashrc
# 重新加载~/.bashrc文件
source ~/.bashrc
搭建 pyroot 环境
- 查看 pyroot 支持的 Python 版本:
输出如下,可以看到刚刚好

#`root-config --python3-version`是查询支持的版本
# 3.10.12为输出
➜  ~ root-config --python3-version
3.10.12
# python3 是运行python3,下面是会显示现在python3版本
➜  ~ python3
Python 3.10.12 (main, Nov 20 2023, 15:14:05) [GCC 11.4.0] on linux
Type "help", "copyright", "credits" or "license" for more information.
>>>
- 设置镜像源
pip3 config set global.index-url http://mirrors.aliyun.com/pypi/simple
pip3 config set global.trusted-host mirrors.aliyun.com
- 安装 Jupyter Lab 及相关库:
pip3 install jupyter jupyterlab notebook metakernel jupyterlab-language-pack-zh-CN jupyterlab-code-formatter black isort jupyter lab
- 使用 VSCode 连接 WSL 的 Jupyter Lab,以获得代码提示功能。
这里就不过多赘述,自行搜索
windows 配置
安装 ROOT 软件
-
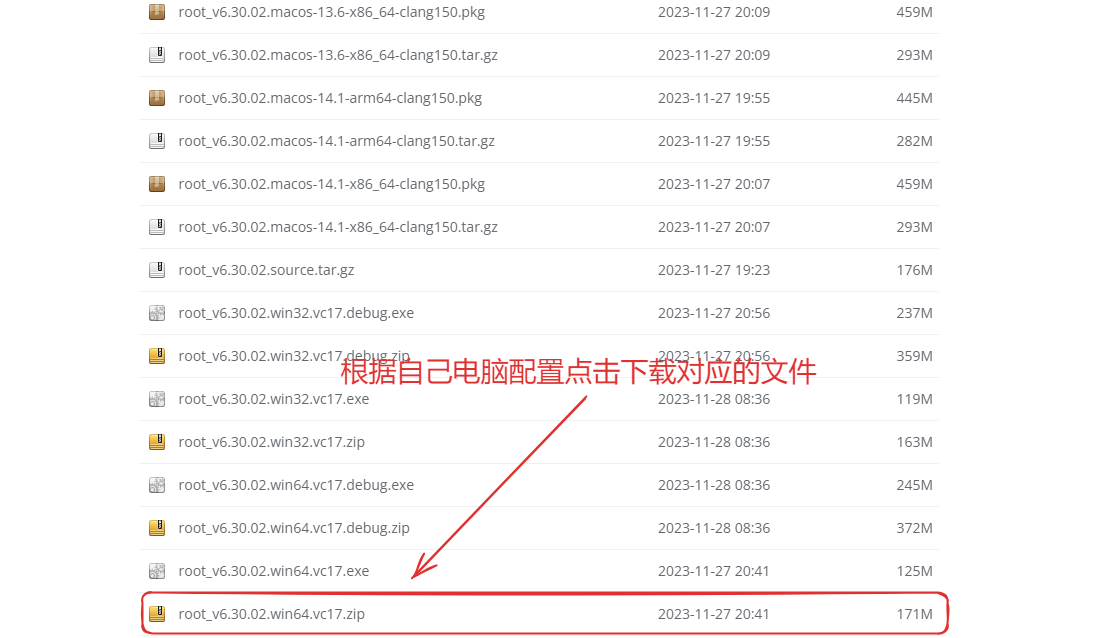
下载预编译文件
-
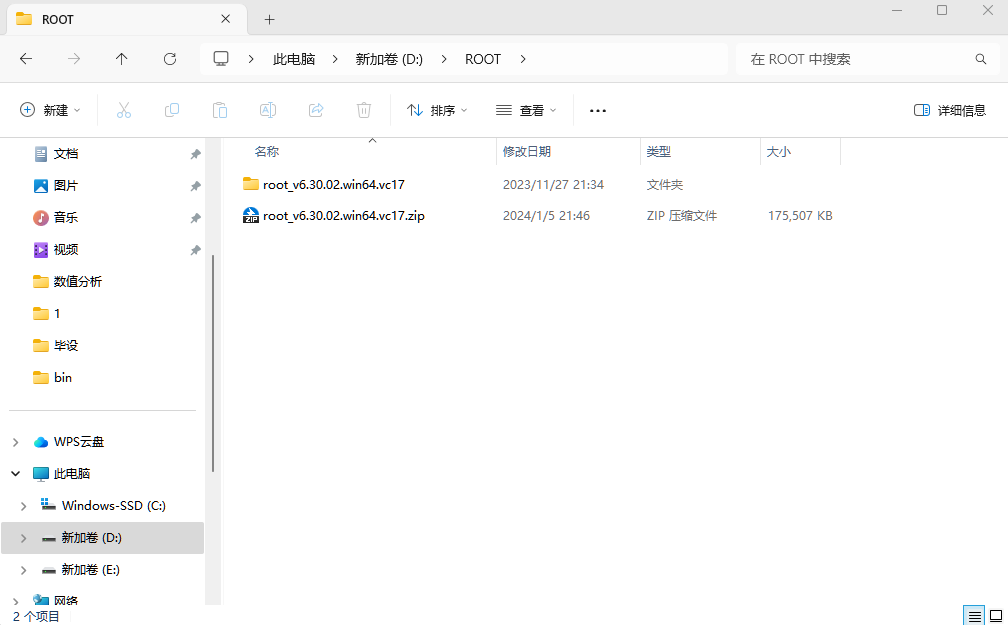
解压文件
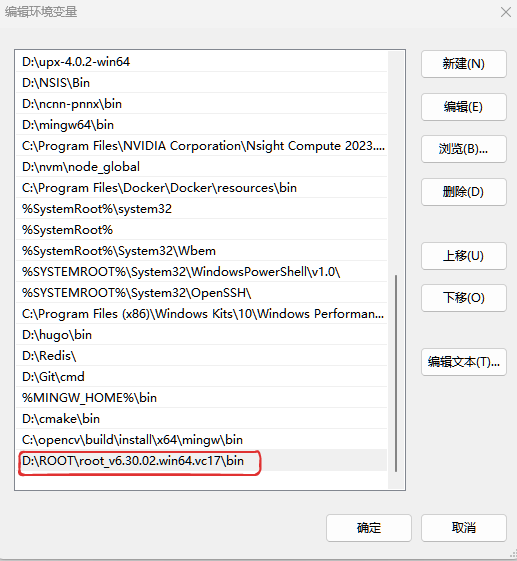
- 把 bin 文件夹路径加入环境变量 path 中
我的 bin 路径是,D:\ROOT\root_v6.30.02.win64.vc17\bin
- 设置 ROOT 的软件包的环境变量和路径
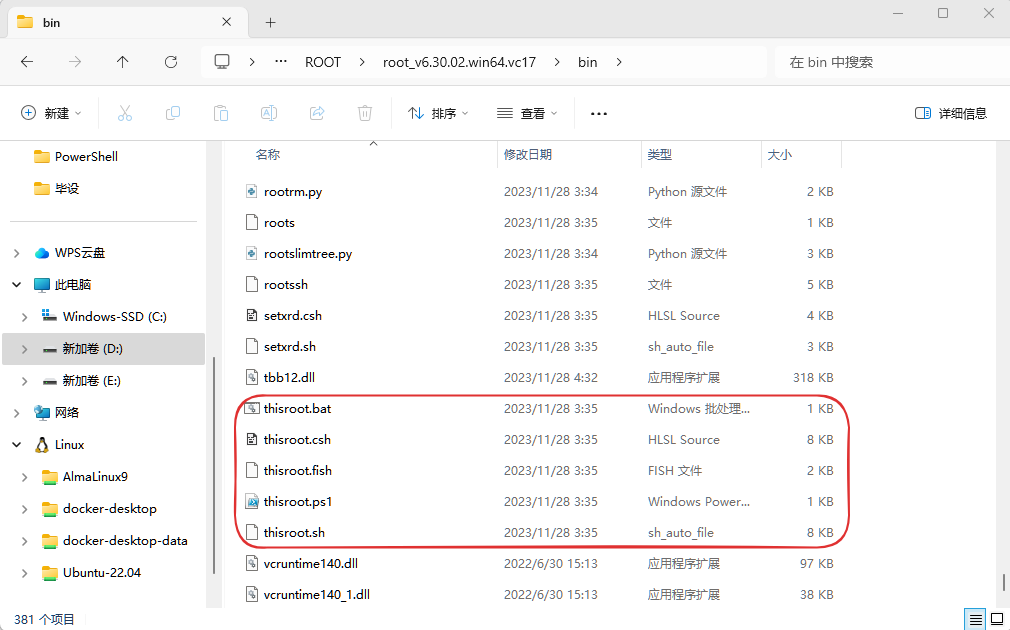
可以看到有多个脚本文件,它们的作用都是一样的。以为我使用的是 powershell,这里就使用thisroot.ps1文件

- 打开 powershell 输入
notepad $PROFILE,然后会打开下面这样一个文件只需要加入. "path\to\thisroot.ps1"就可以,其它的不需要管,那是我的终端美化操作。
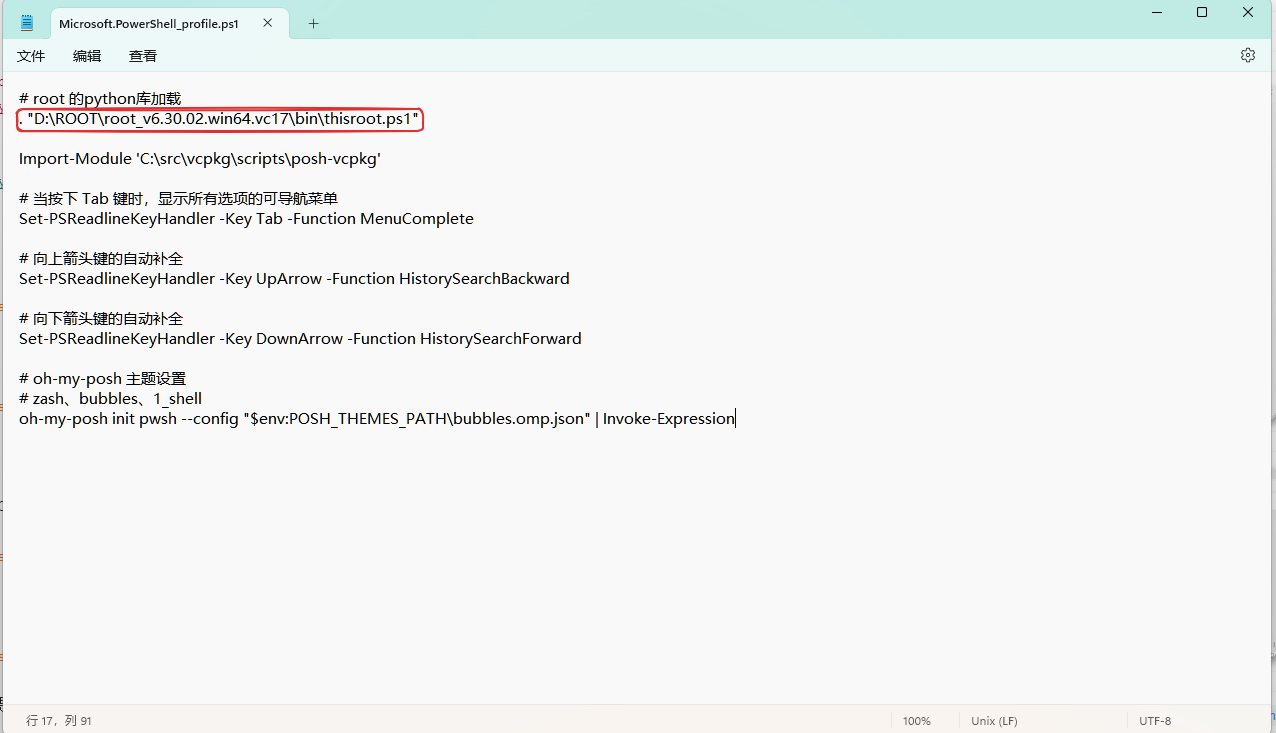
- 在 powershell 终端输入
. $PROFILE重新加载脚本
pyroot 配置
经过测试pyroot在 win 上的 jupyter 支持不够好,只能在 python 解释器中使用,所以建议使用上面的 wsl 方法。
- 查询适配 python 版本
# powershell 终端运行root-config --python-version命令
root-config --python-version
# 下面是终端输出,代表支持python3.8.10版本
 3.8.10
- 安装对应 python 版本
可以直接安装 python 版本或者使用 conda 安装对应版本
# conda 安装python=3.8命令
conda create -n pyroot python=3.8
- 测试
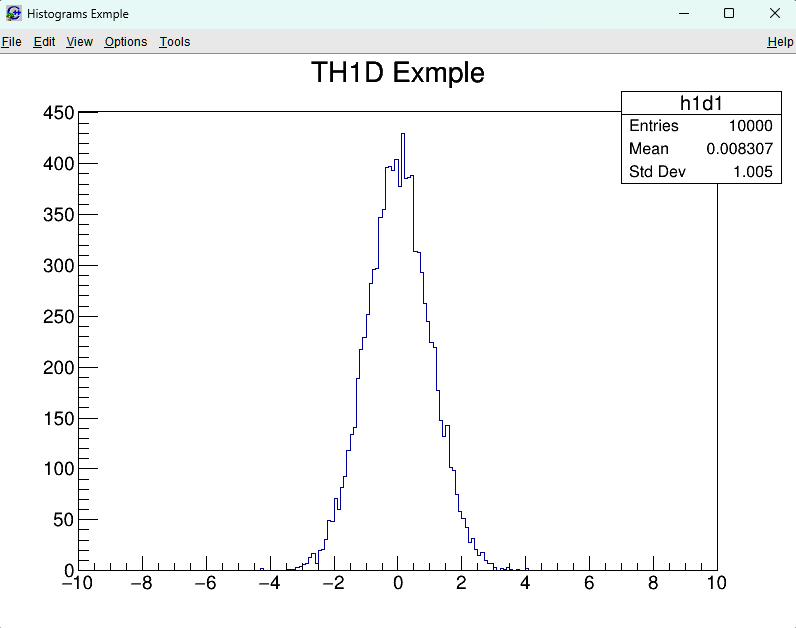
下面这样情况代表成功。

- 运行代码示例
from ROOT import (
    TH1D,
    TCanvas,
    TApplication,
)
app = TApplication("myapp", 0, 0) # 这个代码不能少
# 创建一个叫c1的画布,标题为Histograms Exmple,画布宽600,高900
c1 = TCanvas("c1", "Histograms Exmple", 800, 600)
# 创建一个叫h1d1,标题为TH1D Exmple,把[-10,10]区间分为200个小区间的直方图
h1d1 = TH1D("h1d1", "TH1D Exmple", 200, -10, 10)
# FillRandom 用于高斯分布、泊松分布等填充。
h1d1.FillRandom("gaus", 10000)  # 使用gaus,并填充10000个数据

h1d1.Draw()
c1.Draw()

app.Run() # 这个代码不能少
下面是代码运行结果
cmake 构建编译
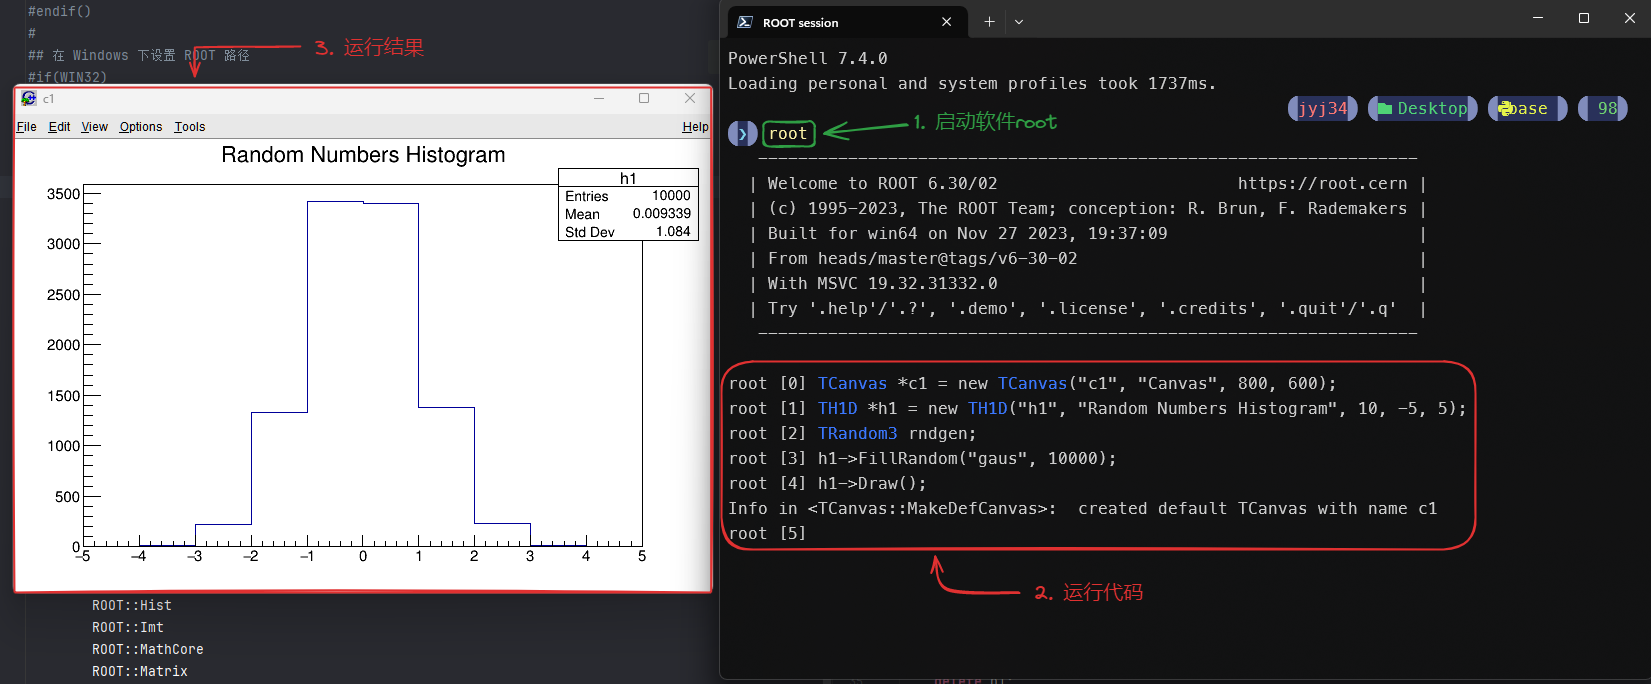
终端运行代码
windows推荐powershell,linux可以使用zsh或者原生终端
首先运行下列代码:
// Create a ROOT canvas
TCanvas *c1 = new TCanvas("c1", "Canvas", 800, 600);

// Create a histogram
TH1D *h1 = new TH1D("h1", "Random Numbers Histogram", 10, -5, 5);

// Create a TRandom3 generator
TRandom3 rndgen;

// Fill the histogram with random numbers
h1->FillRandom("gaus", 10000);

// Draw the histogram
h1->Draw();

// Draw the canvas
c1->Draw();
运行结果:
Clion 编写代码与运行
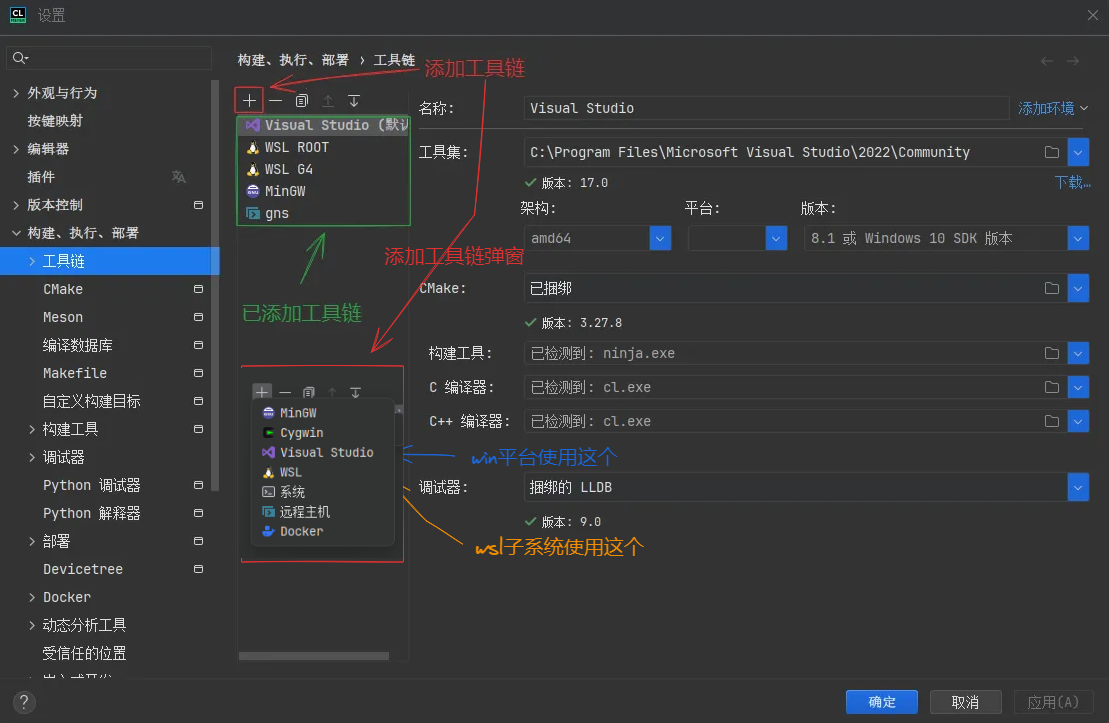
1. 配置编译器
- 配置工具链:
设置 -> 构建、执行、部署 -> 工具链
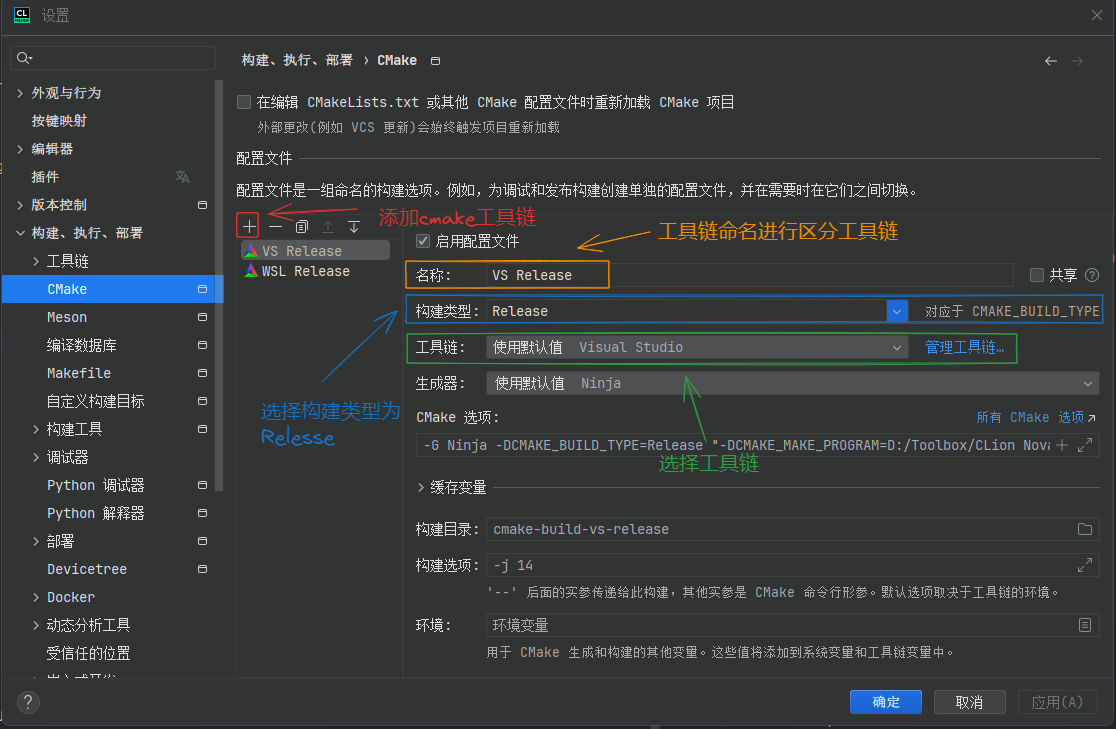
- 配置 cmake:
上面设置好工具链后,就可以设置 cmake 使用的工具链了。
(这里我 wsl 子系统与 win 都设置好了,所有有两个工具链)
2. 便编写 CMakeLists.txt 内容
cmake_minimum_required(VERSION 3.16...3.21)
project(analy-root-file)

# 设置可执行文件的名称
set(EXECUTABLE_NAME "main")

# 设置 C++ 标准
set(CMAKE_CXX_STANDARD 17)

# 设置引用的库路径已经通过 thisroot.ps1/sh 设置好了,如果没有设置,需要手动配置
## 在 Linux 下设置 ROOT 路径
#if(UNIX)
#    set(ROOT_INCLUDE_DIRS "/root/ROOT/root/include")
#    set(CMAKE_PREFIX_PATH "/root/ROOT/root")
#endif()
#
## 在 Windows 下设置 ROOT 路径
#if(WIN32)
#    set(ROOT_INCLUDE_DIRS "D:/ROOT/root_v6.30.02.win64.vc17/include")
#    set(CMAKE_PREFIX_PATH "D:/ROOT/root_v6.30.02.win64.vc17")
#endif()

# 查找 ROOT
find_package(ROOT REQUIRED COMPONENTS RIO Tree Hist)

#include_directories(${ROOT_INCLUDE_DIRS})


# 添加可执行文件
add_executable(${EXECUTABLE_NAME} main.cc)


# 链接 ROOT 库
target_link_libraries(${EXECUTABLE_NAME} PUBLIC
        ROOT::RIO
        ROOT::Tree
        ROOT::Hist
        ROOT::Core
        ROOT::Gpad
        ROOT::Graf3d
        ROOT::Graf
        ROOT::Hist
        ROOT::Imt
        ROOT::MathCore
        ROOT::Matrix
        ROOT::Net
        ROOT::Physics
        ROOT::Postscript
        ROOT::RIO
        ROOT::ROOTDataFrame
        ROOT::ROOTVecOps
        ROOT::Rint
        ROOT::Thread
        ROOT::TreePlayer
        ROOT::Tree
)

# 并行处理,win不支持
if(UNIX)
    target_link_libraries(main PUBLIC ROOT::MultiProc)
endif()
编写运行代码
编写代码:
#include <TCanvas.h>
#include <TH1.h>
#include <TRandom3.h>
#include <TSystem.h>
#include <iostream>
#include <TApplication.h>

using namespace std;

int main() {
    TApplication app("myapp", 0, 0);

    // Create a ROOT canvas
    TCanvas *c1 = new TCanvas("c1", "Canvas", 800, 600);

    // Create a histogram
    TH1D *h1 = new TH1D("h1", "Random Numbers Histogram", 10, -5, 5);

    // Create a TRandom3 generator
    TRandom3 rndgen;

    // Fill the histogram with random numbers
    h1->FillRandom("gaus", 10000);

    // Draw the histogram
    h1->Draw();

    // Draw the canvas
    c1->Draw();

    app.Run();

    // Clean up
    delete c1;
    delete h1;

    cout << "Hello, World!" << endl;
    return 0;
}
运行代码:
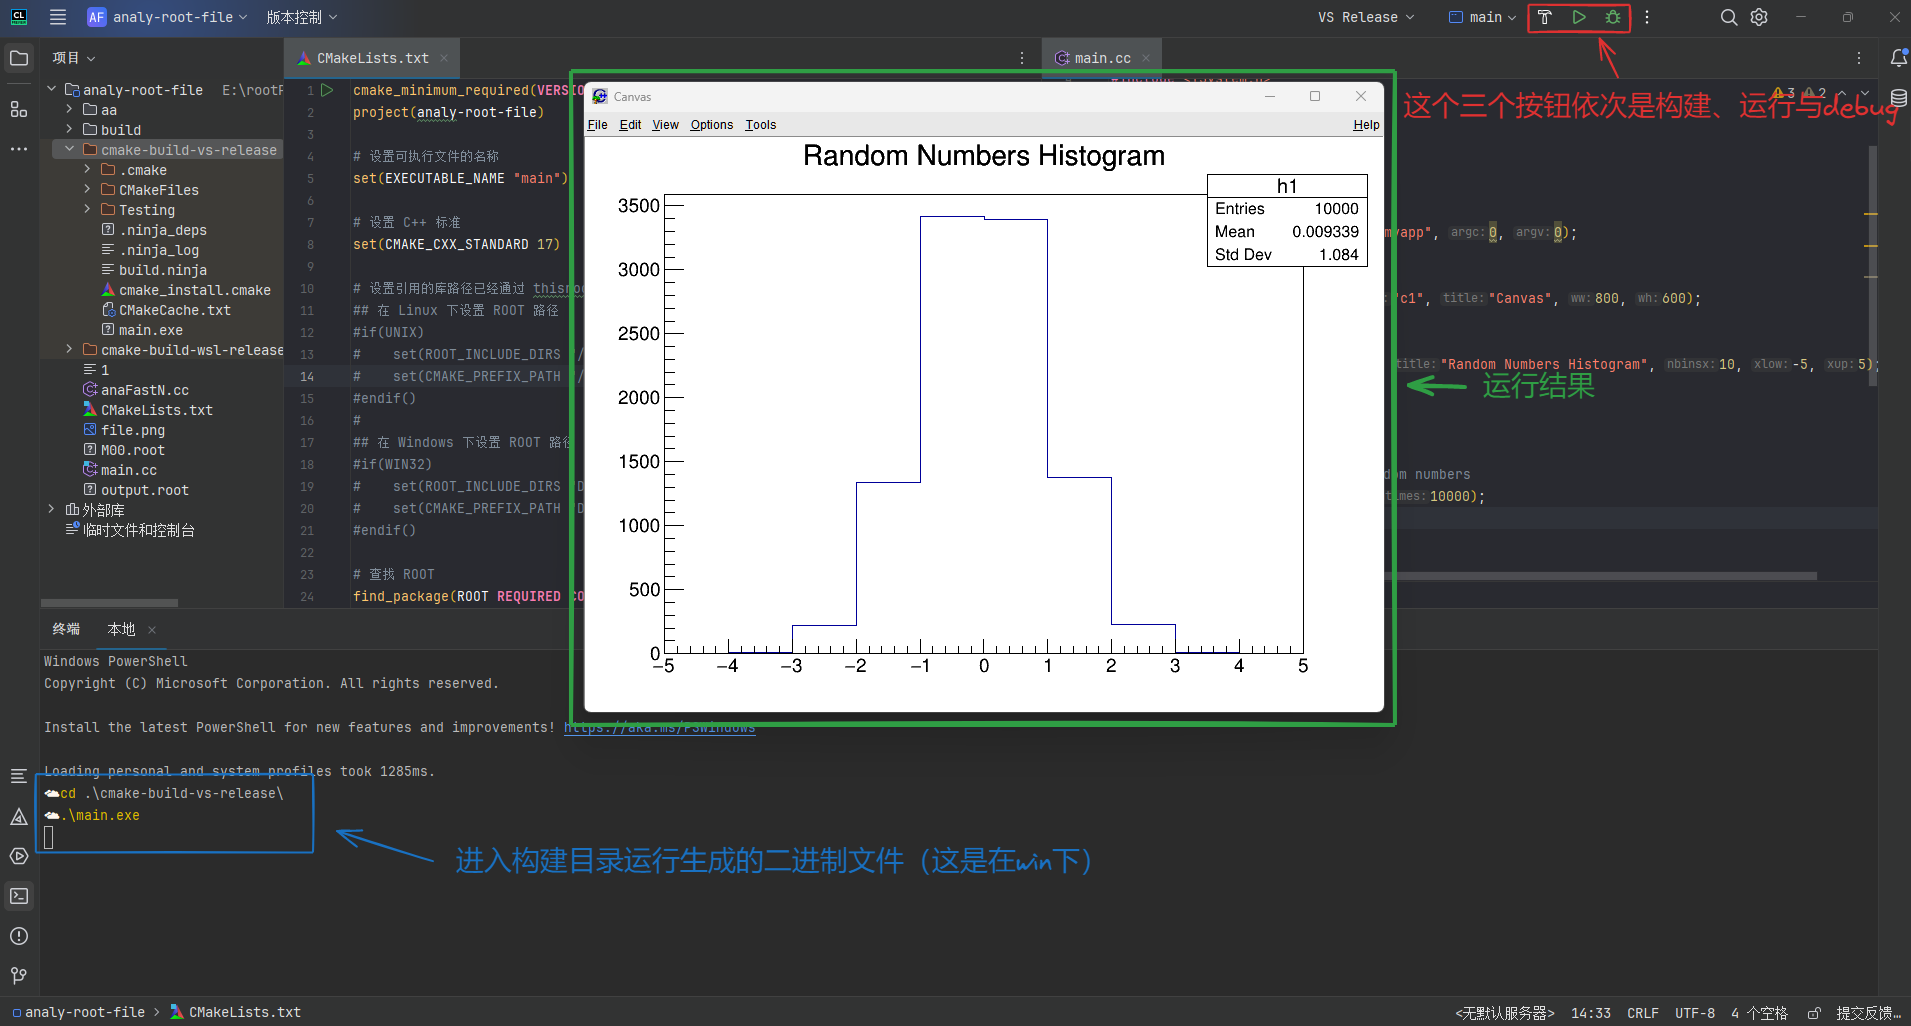
注意事项
确保以下 3 行代码存在,以确保图形能够正确显示:
#include <TApplication.h>
TApplication app("myapp", 0, 0);
app.Run();
如果没有上面这 3 行代码,当使用 Clion 运行时会发现,仅仅会输出hello world!,但是就是没有绘制的图形。
总结
以上就是我目前使用的整个软件的搭建方法。
如果是想用 C++写代码,推荐使用 cmake 的方法,这样有代码提示,查看源码的优点。如果使用 pyroot,不建议使用 ROOT 的官方绑定库,推荐使用 uproot 库,结合 numba 库进行加速,使用 jupyter lar 进行编辑,非常的方便。